Console
Manage and monitor your apps with the SST Console.
The Console is a web based dashboard to manage your SST apps. With it you can invoke functions, debug issues, view logs, and git push to deploy your apps, with your team — console.sst.dev
Get started
Start by creating an account and connecting your AWS account.
-
Create an account with your email
It’s better to use your work email so that you can invite your team to your workspace later — console.sst.dev
-
Create a workspace
You can add your apps and invite your team to a workspace. A workspace can be for a personal project or for your team at work. You can create as many workspaces as you want.
-
Connect your AWS account
This will ask you to create a CloudFormation stack in your AWS account. Make sure that this stack is being added to us-east-1. Scroll down and click Create stack.
This stack will scan all the regions in your account for SST apps and subscribe to them. Once created, you’ll see all your apps, stages, and the functions in the apps.
-
Invite your team
Use the email address of your teammates to invite them. They just need to login with the email you’ve used and they’ll be able to join your workspace.
How it works
At a high level, here’s how the Console works.
-
It’s hosted on our side
It stores some metadata about what resources you have deployed. We’ll have a version that can be self-hosted in the future.
-
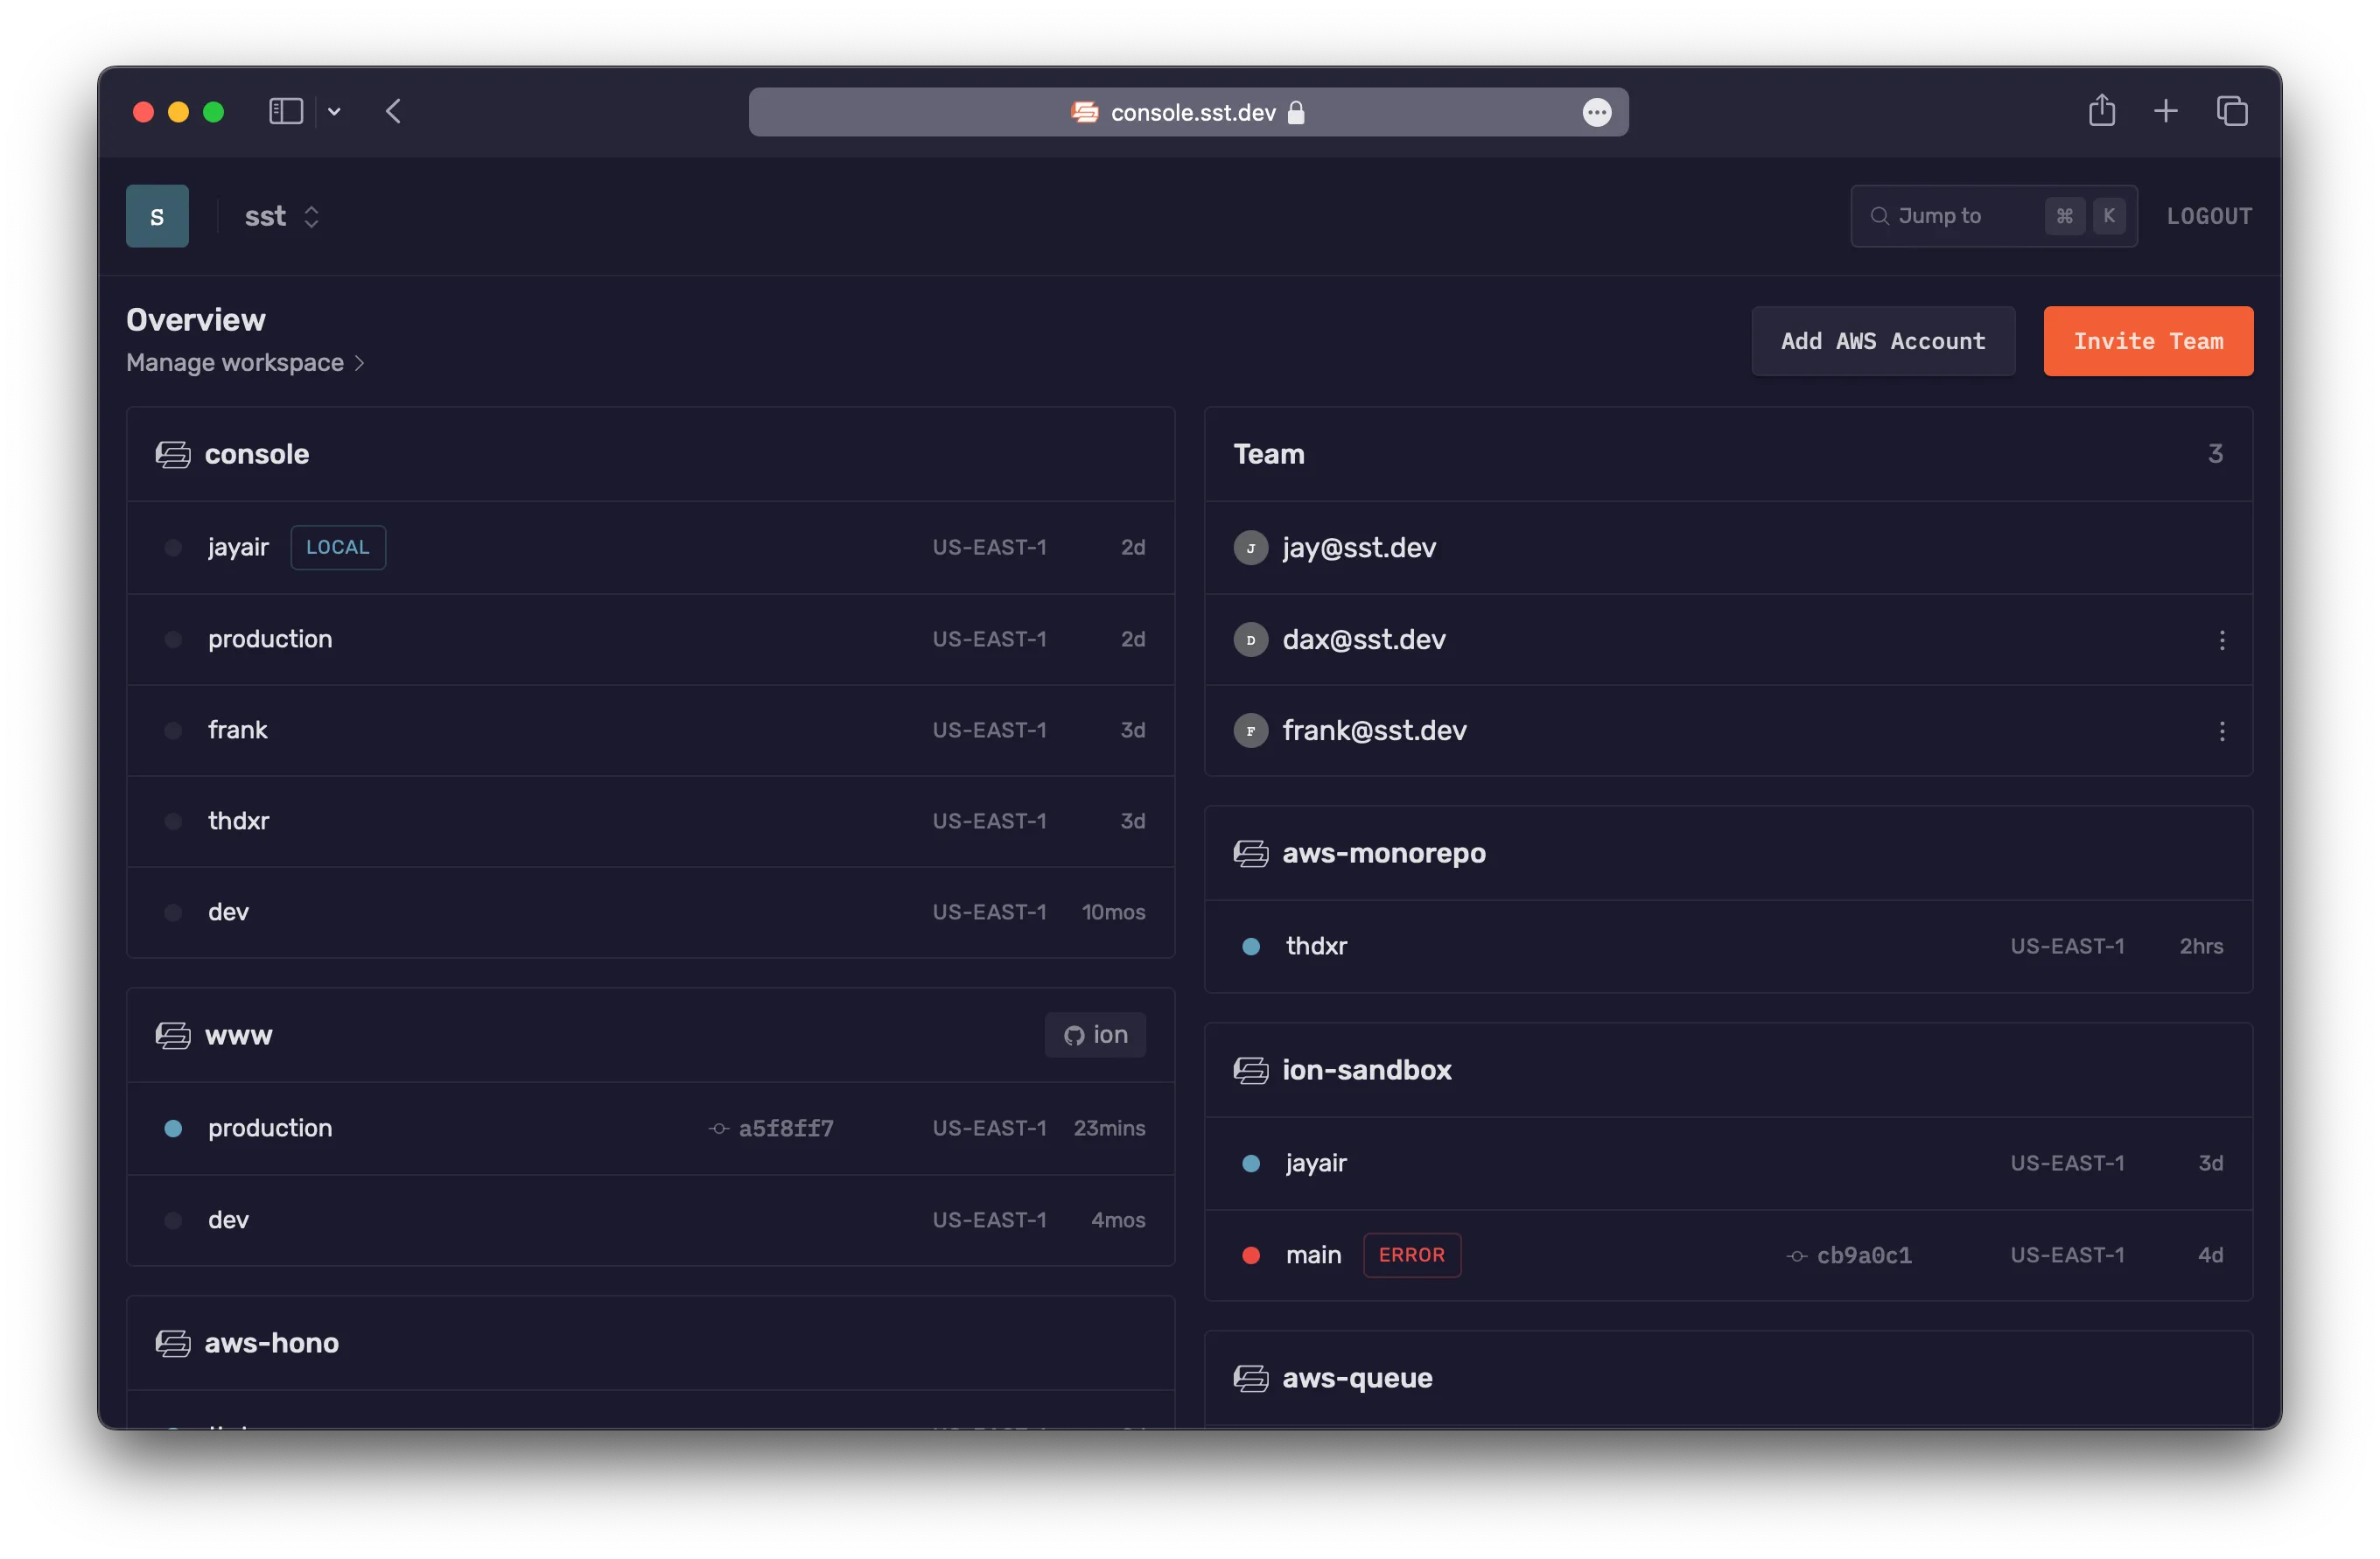
You can view all your apps and stages
Once you’ve connected your AWS accounts, it’ll deploy a separate CloudFormation stack and connect to any SST apps in it. And all your apps and stages will show up automatically.
-
You can manage your apps
You can view all the functions in your app. You can view all the issues in your functions in real-time with the source maps automatically applied. You can view their logs, invoke them, or replay invocations. You can also save event payloads to your workspace.
For your functions running Live, the logs will be streamed in real-time from your local machine.
-
It’s open-source, built with SST, and deployed with Seed
The Console is a full-stack SST app. You can view the source on GitHub.
Security
The CloudFormation stack that the Console uses, creates an IAM Role in your account to manage your resources. If this is a concern for your production environments, we have a couple of options.
By default, this role is granted AdministratorAccess, but you can customize it to restrict access. We’ll look at this below. Additionally, if you’d like us to sign a BAA, feel free to contact us.
There maybe cases where you don’t want any data leaving your AWS account. For this, we’ll be supporting self-hosting the Console in the future.
IAM permissions
Permissions for the Console fall into two categories: read and write:
-
Read Permissions: The Console needs specific permissions to display information about resources within your SST apps.
Purpose AWS IAM Action Fetch stack outputs cloudformation:DescribeStacksRetrieve function runtime and size lambda:GetFunctionAccess stack metadata ec2:DescribeRegionss3:GetObjects3:ListBucketDisplay function logs logs:DescribeLogStreamslogs:FilterLogEventslogs:GetLogEventslogs:StartQueryMonitor invocation usage cloudwatch:GetMetricDataAttach the
arn:aws:iam::aws:policy/ReadOnlyAccessAWS managed policy to the IAM Role for comprehensive read access. -
Write Permissions: The Console requires the following write permissions.
Purpose AWS IAM Action Forward bootstrap bucket events to event bus s3:PutBucketNotificationSend events to Console events:PutRuleevents:PutTargetsGrant event bus access for Console iam:CreateRoleiam:DeleteRoleiam:DeleteRolePolicyiam:PassRoleiam:PutRolePolicyEnable Issues to subscribe logs logs:CreateLogGrouplogs:PutSubscriptionFilterInvoke Lambda functions and replay invocations lambda:InvokeFunction
It’s good practice to periodically review and update these policies.
Customize policy
To customize IAM permissions for the CloudFormation stack:
-
On the CloudFormation create stack page, download the default
template.json. -
Edit the template file with necessary changes.
View the template changes
template.json "SSTRole": {"Type": "AWS::IAM::Role","Properties": {..."ManagedPolicyArns": ["arn:aws:iam::aws:policy/AdministratorAccess""arn:aws:iam::aws:policy/ReadOnlyAccess"],"Policies": [{"PolicyName": "SSTPolicy","PolicyDocument": {"Version": "2012-10-17","Statement": [{"Effect": "Allow","Action": ["s3:PutBucketNotification"],"Resource": ["arn:aws:s3:::sstbootstrap-*"]},{"Effect": "Allow","Action": ["events:PutRule","events:PutTargets"],"Resource": {"Fn::Sub": "arn:aws:events:*:${AWS::AccountId}:rule/SSTConsole*"}},{"Effect": "Allow","Action": ["iam:CreateRole","iam:DeleteRole","iam:DeleteRolePolicy","iam:PassRole","iam:PutRolePolicy"],"Resource": {"Fn::Sub": "arn:aws:iam::${AWS::AccountId}:role/SSTConsolePublisher*"}},{"Effect": "Allow","Action": ["logs:CreateLogGroup","logs:PutSubscriptionFilter"],"Resource": {"Fn::Sub": "arn:aws:logs:*:${AWS::AccountId}:log-group:*"}},{"Effect": "Allow","Action": ["lambda:InvokeFunction"],"Resource": {"Fn::Sub": "arn:aws:lambda:*:${AWS::AccountId}:function:*"}}]}}]}} -
Upload your edited
template.jsonfile to an S3 bucket. -
Return to the CloudFormation create stack page and replace the template URL in the page URL.
Pricing
The Console pricing is based on the number of times the Lambda functions in your SST apps are invoked per month and it uses the following tiers.
| Invocations | Rate (per invocation) |
|---|---|
| First 1M | Free |
| 1M - 10M | $0.00002 |
| 10M+ | $0.000002 |
A couple of things to note.
- These are calculated for a given workspace on a monthly basis.
- This does not apply to personal stages, they’ll be free forever.
- There’s also a soft limit for Issues on all accounts.
- For volume pricing, feel free to contact us.
Features
Here are a few of the things the Console does for you.
- Logs: View logs from the functions in your app
- Issues: Get real-time alerts for any errors in your functions
- Local logs: View logs from your local
sst devsession - Resources: View the resources in your app and their history
- Autodeploy: Auto-deploy your app when you git push to your repo
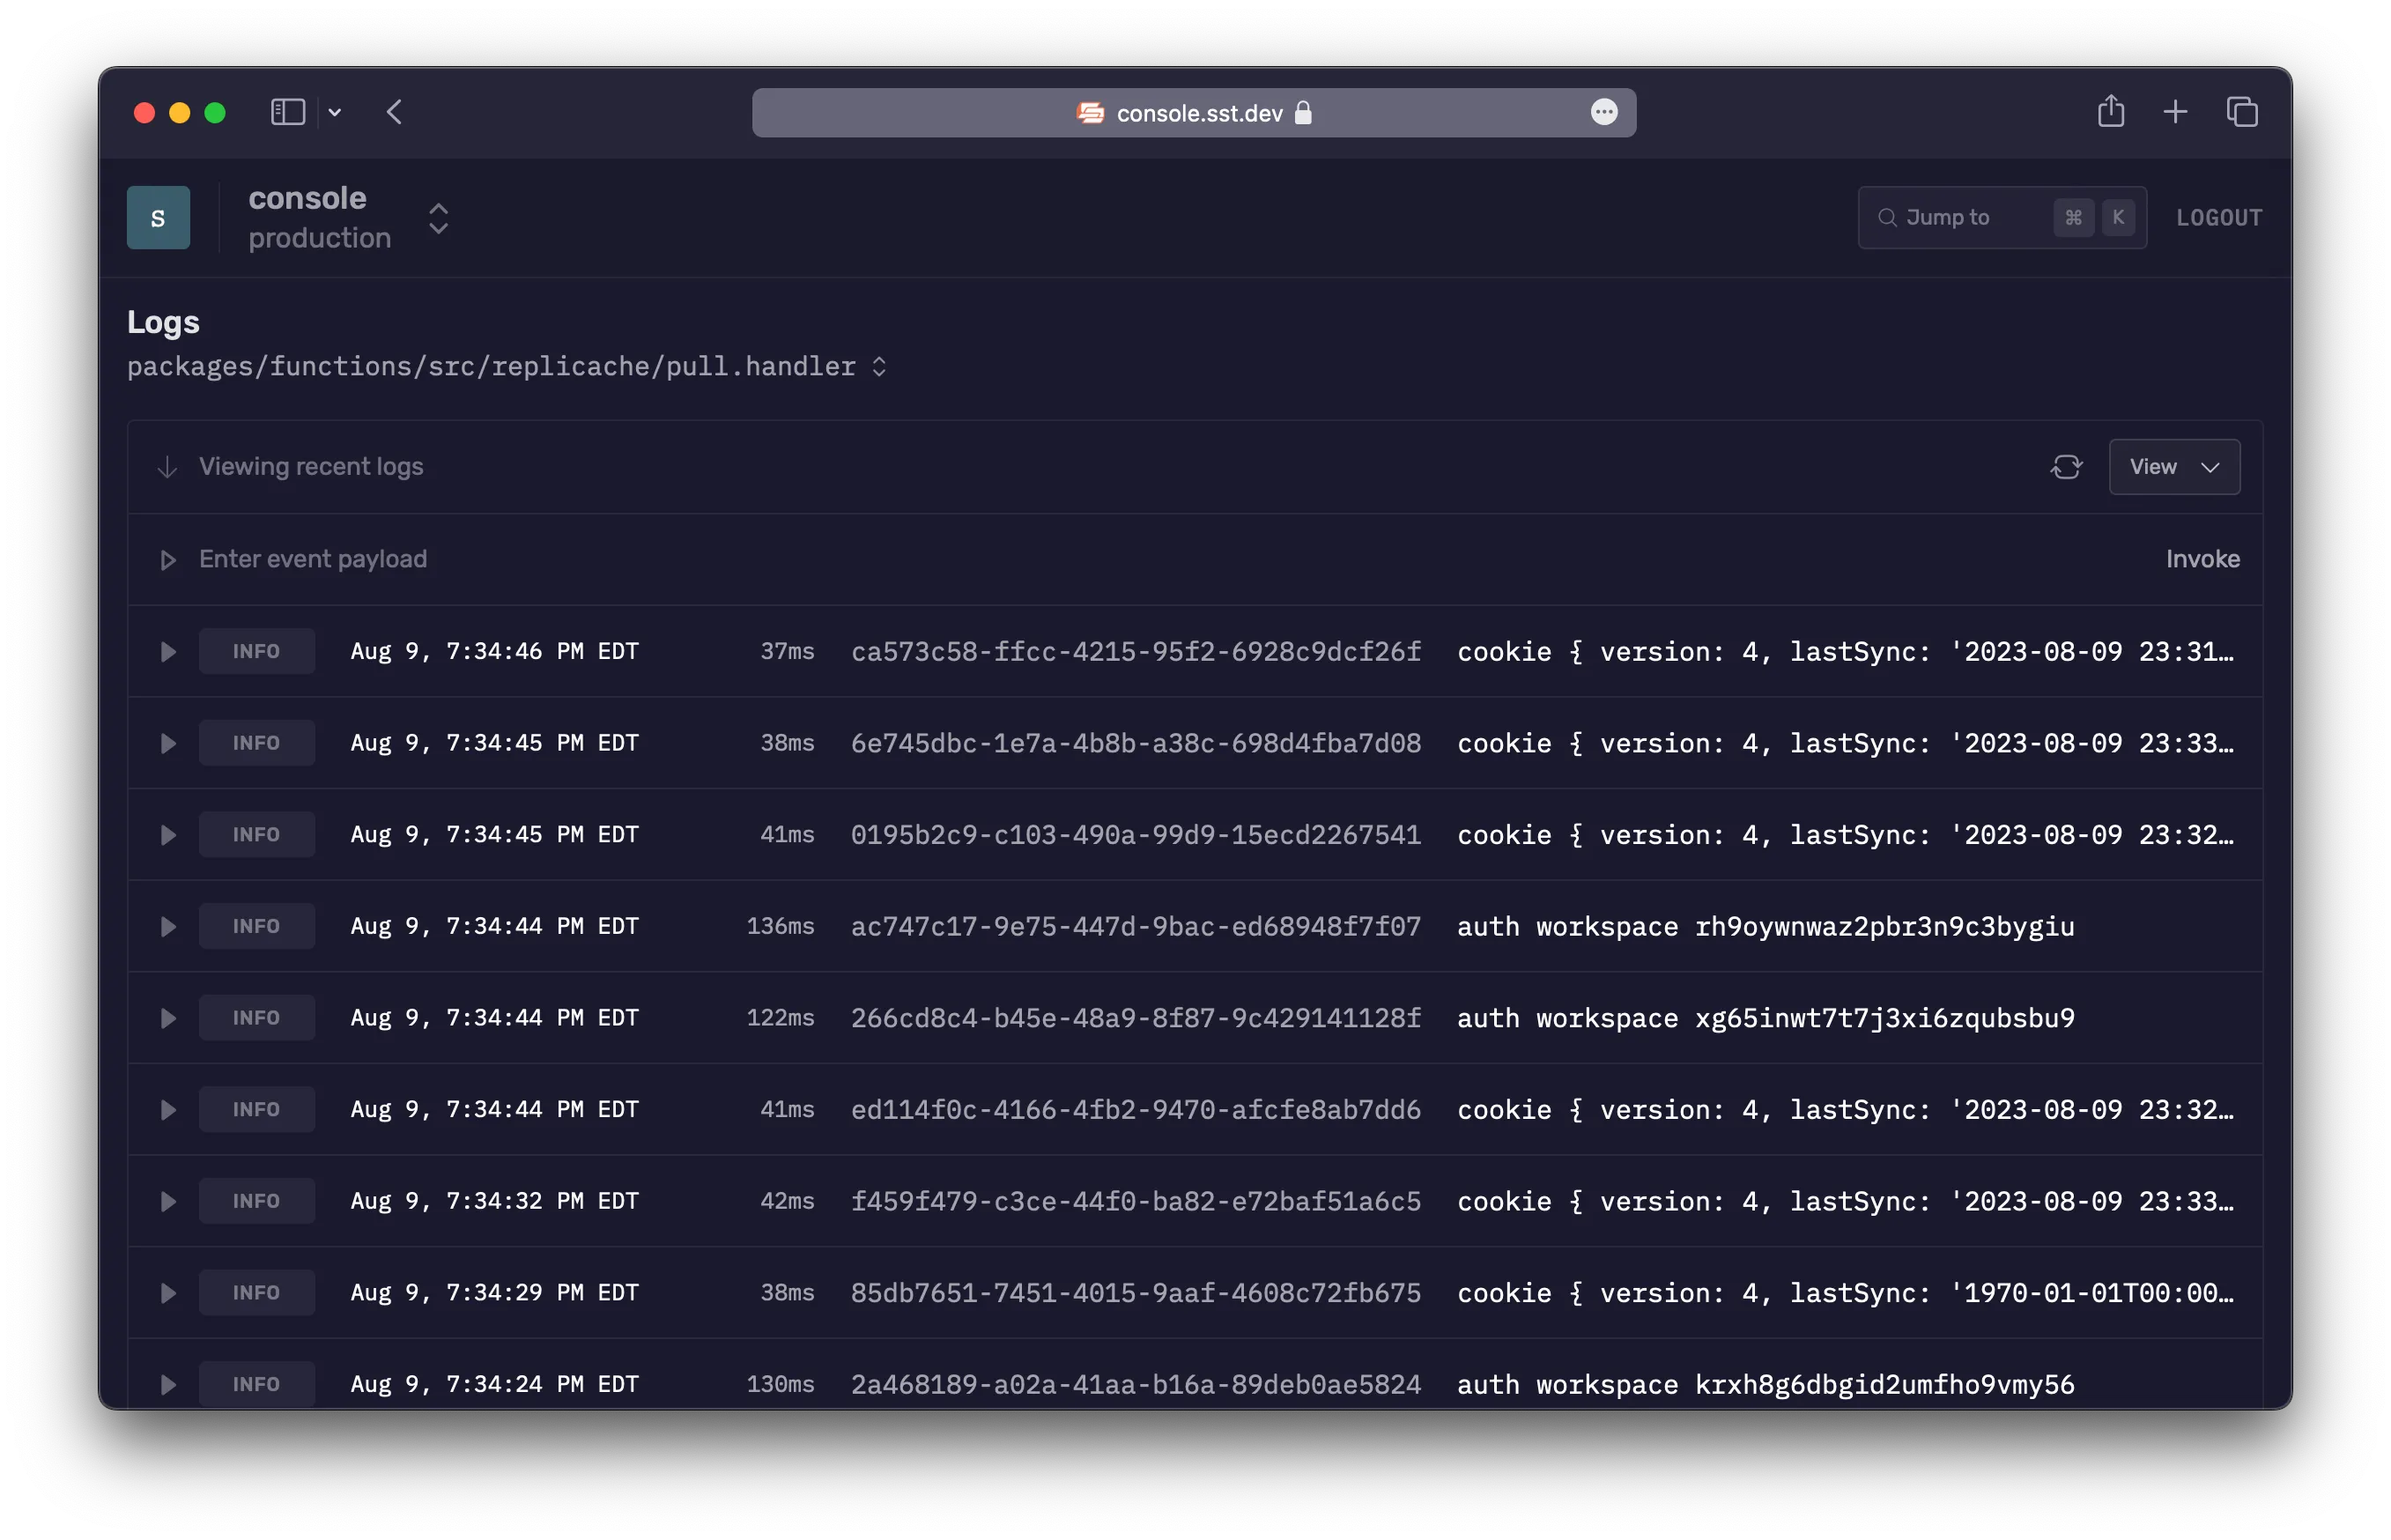
Logs
With the Console, you don’t need to go to CloudWatch to look at the logs for your functions. You can view:
- Past logs
- Live logs
- Jump to a specific time
Issues
The Console will automatically show you any errors in your Lambda functions in real-time. And notify you through Slack or email.
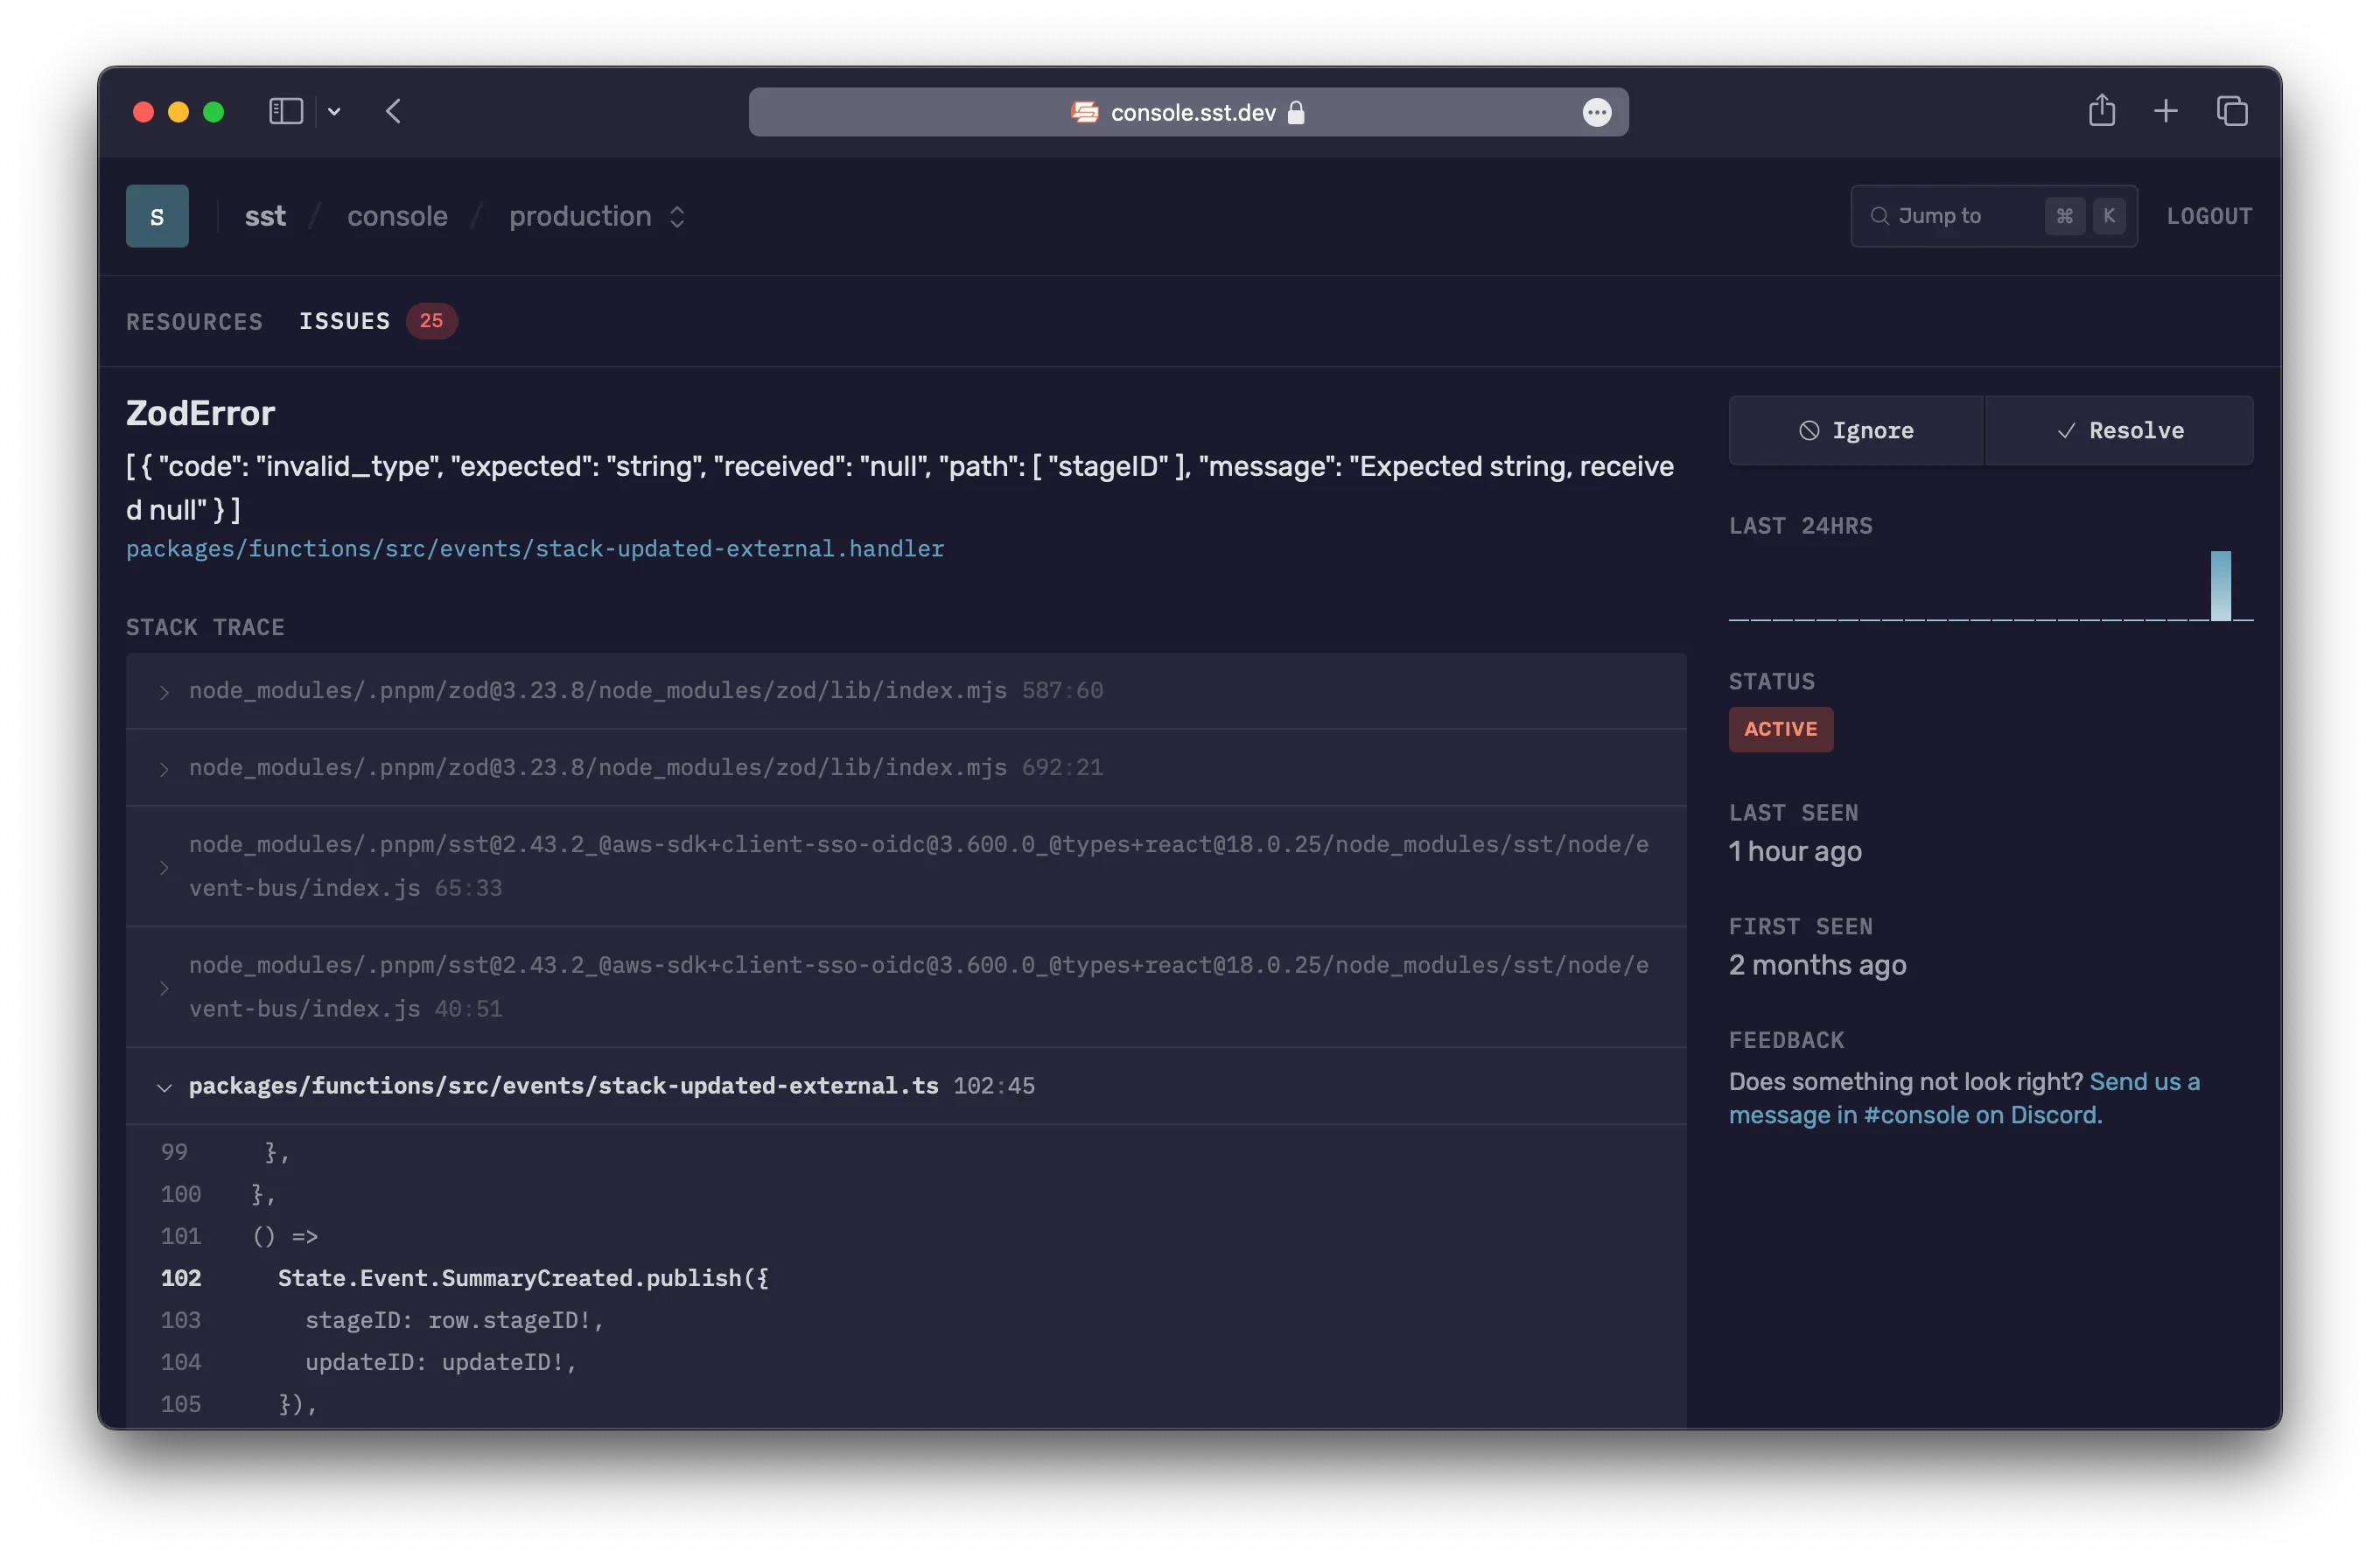
With Issues, there is:
- Nothing to setup, no code to instrument
- Source maps are supported automatically
- No impact on performance or cold starts, since the functions aren’t modified
Behind the scenes
Here’s how it works.
- When an app is deployed or when an account is first synced, we add a log subscriber to your Lambda functions.
- There’s a maximum of 2 subscribers allowed. More on this below.
- The subscriber filters for anything that looks like an error and processes those log lines.
- It applies the source maps to the error stack trace.
- Finally, it groups similar looking errors together.
Log subscriber
The process of adding a log subscriber to your Lambda functions might fail. This can happen if:
- We don’t have enough permissions to add a subscriber. In this case, update the permissions that you’ve granted to the Console.
- We’ve hit the limit for the number of subscribers. To fix this, you can remove one of the existing subscribers.
You can see these errors in the Issues tab. Once you’ve fixed these issues, you can hit Retry and it’ll try attaching the subscriber again.
Error detection
Issues reports Lambda function failures. In addition, for Node.js it reports errors that are logged using console.error(new Error("my-error")).
For the Console to automatically report your errors, you need to pass in an error object with the console.error call.
console.error(new Error("my-error"));Limits
There’s a soft limit of 10K issues per hour per workspace. If your account goes over this limit, Issues will be temporarily paused. You can contact us if this happens.
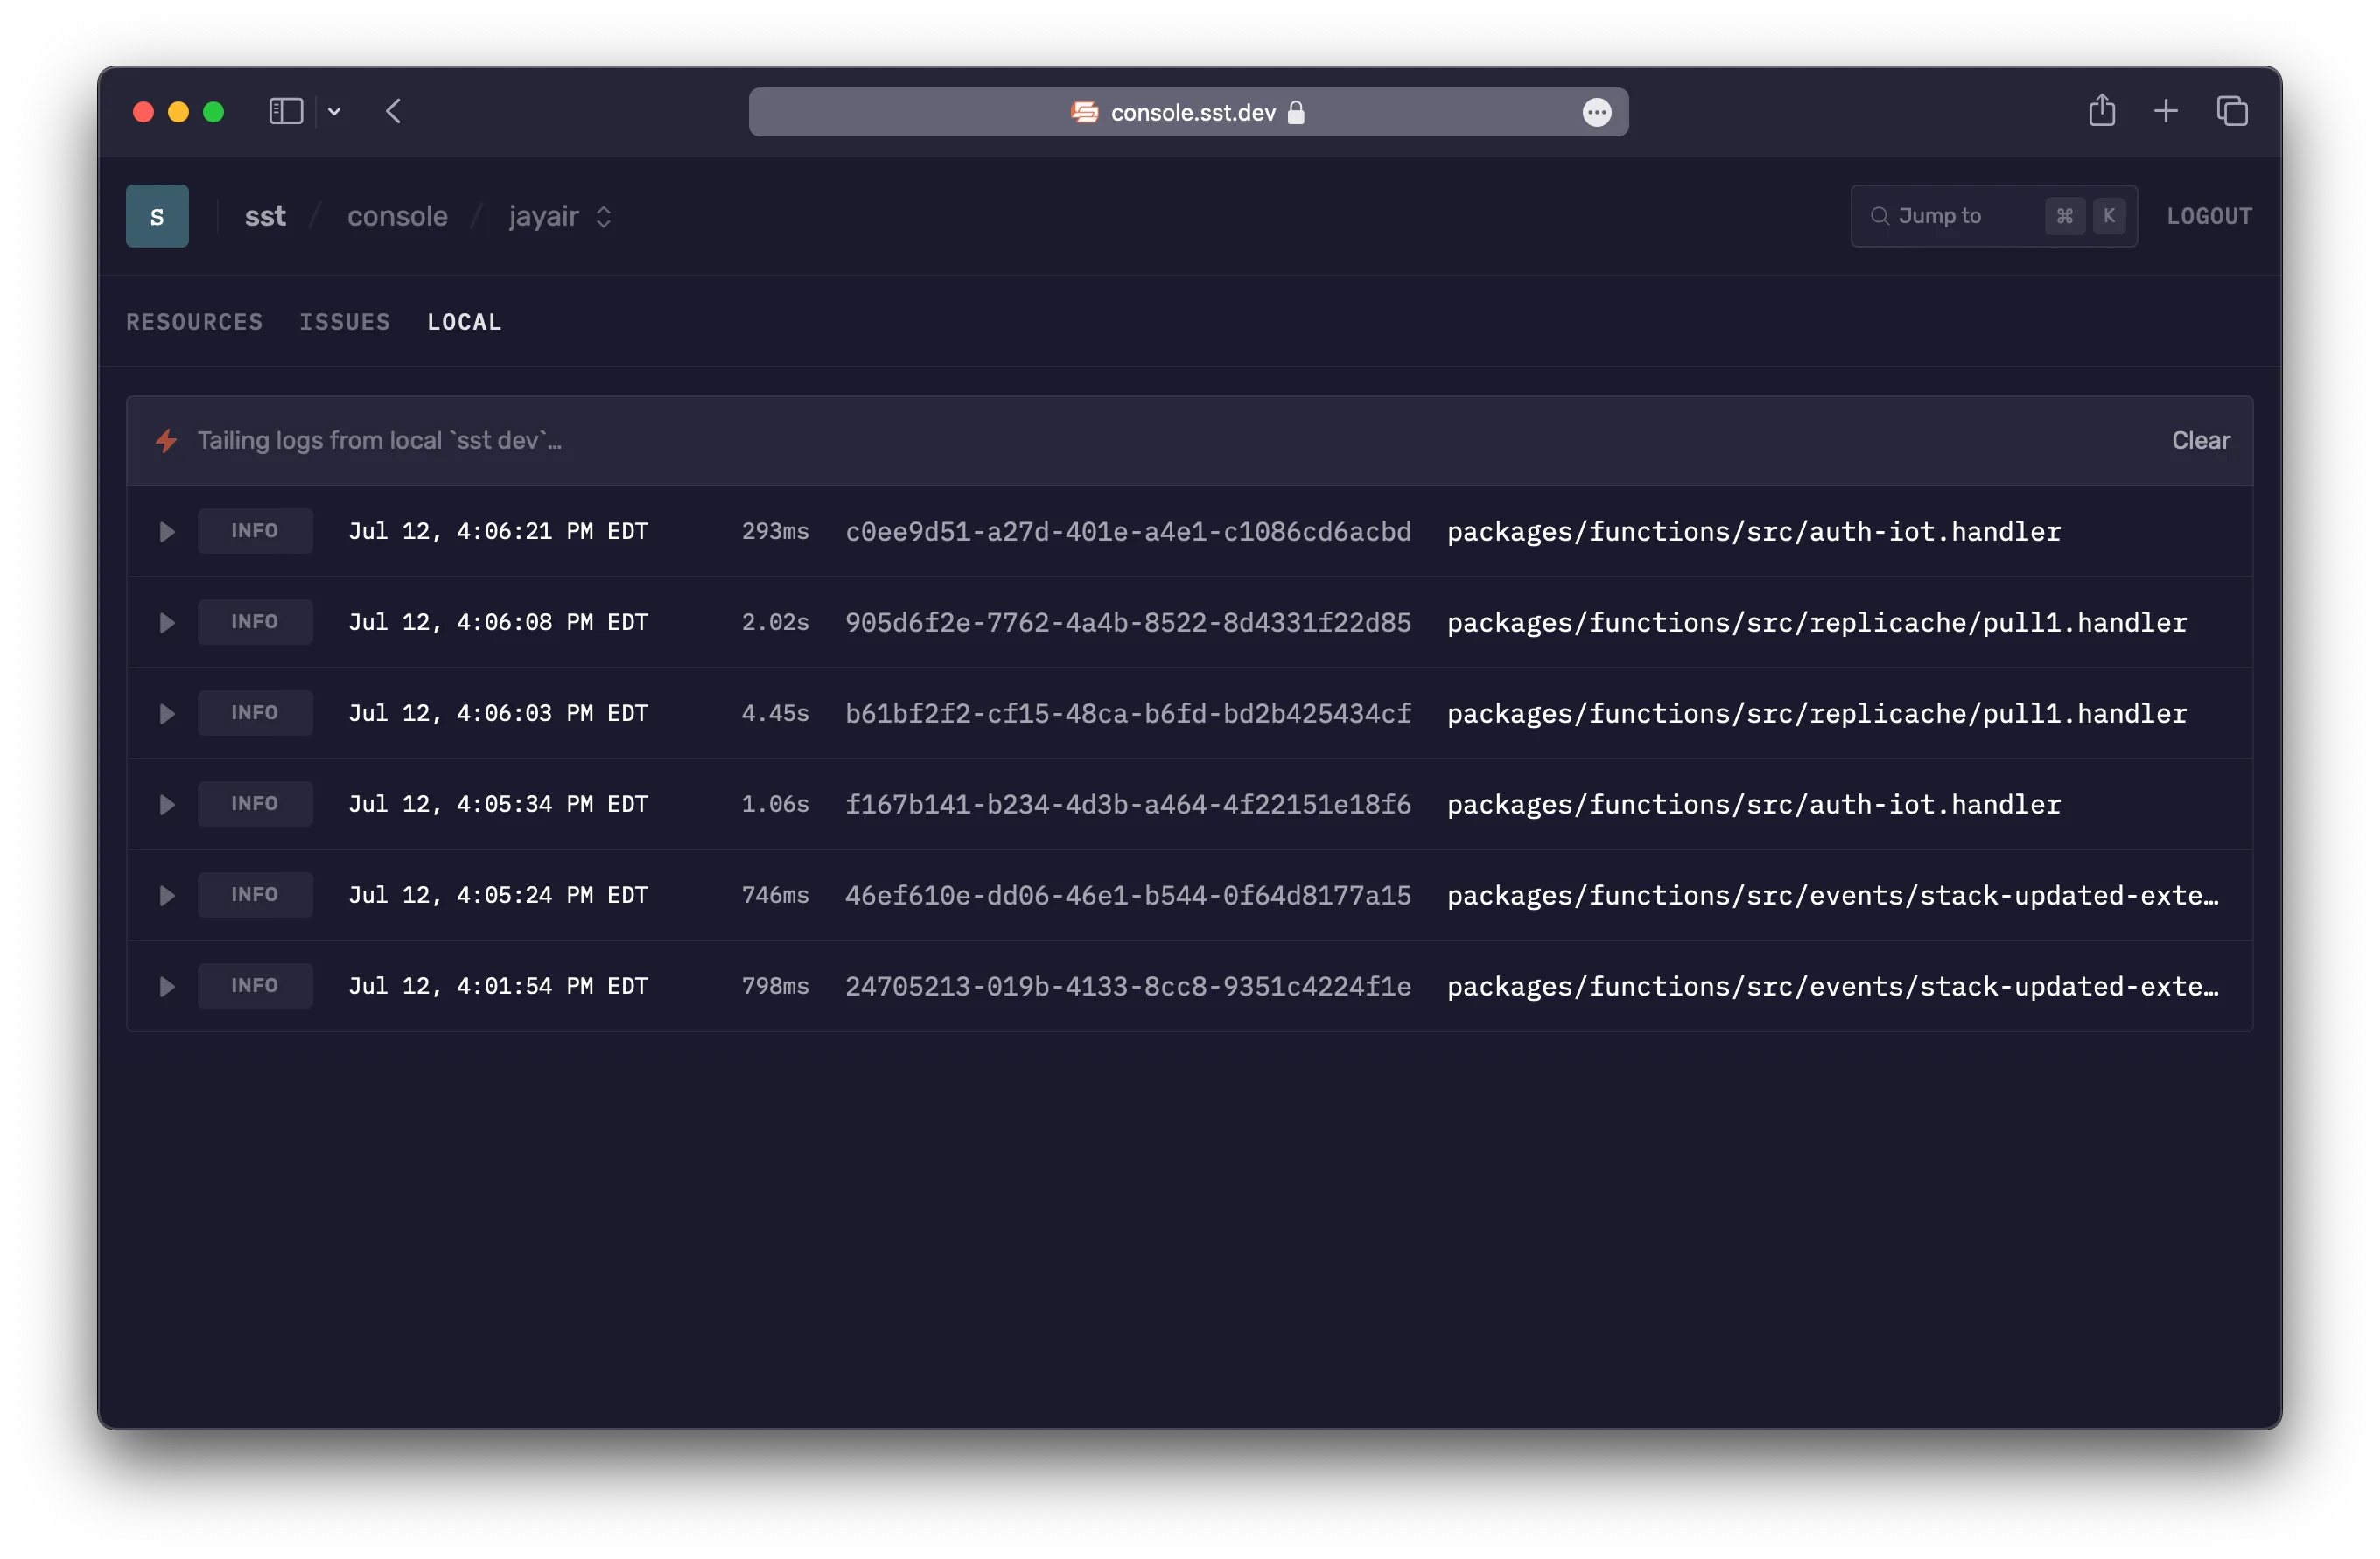
Local logs
When the Console starts up, it checks if you are running sst dev locally. If so, then it’ll show you real-time logs from your local terminal. This works by connecting to a local server that’s run as a part of the SST CLI.
The local server only allows access from localhost and console.sst.dev.
The local logs works in all browsers and environments. But for certain browsers like Safari or Brave, and Gitpod, it needs some additional configuration.
Safari & Brave
Certain browsers like Safari and Brave require the local connection between the browser and the sst dev CLI to be running on HTTPS.
SST can integrate with mkcert to automatically generate a self-signed certificate. If you need support for this, feel free to open an issue on GitHub.
Gitpod
If you are using Gitpod, you can use the Gitpod Local Companion app to connect to the sst dev process running inside your Gitpod workspace.
To get started:
- Install Gitpod Local Companion app
- Run the Companion app
- Navigate to Console in the browser
The companion app runs locally and creates a tunnelled connection to your Gitpod workspace.
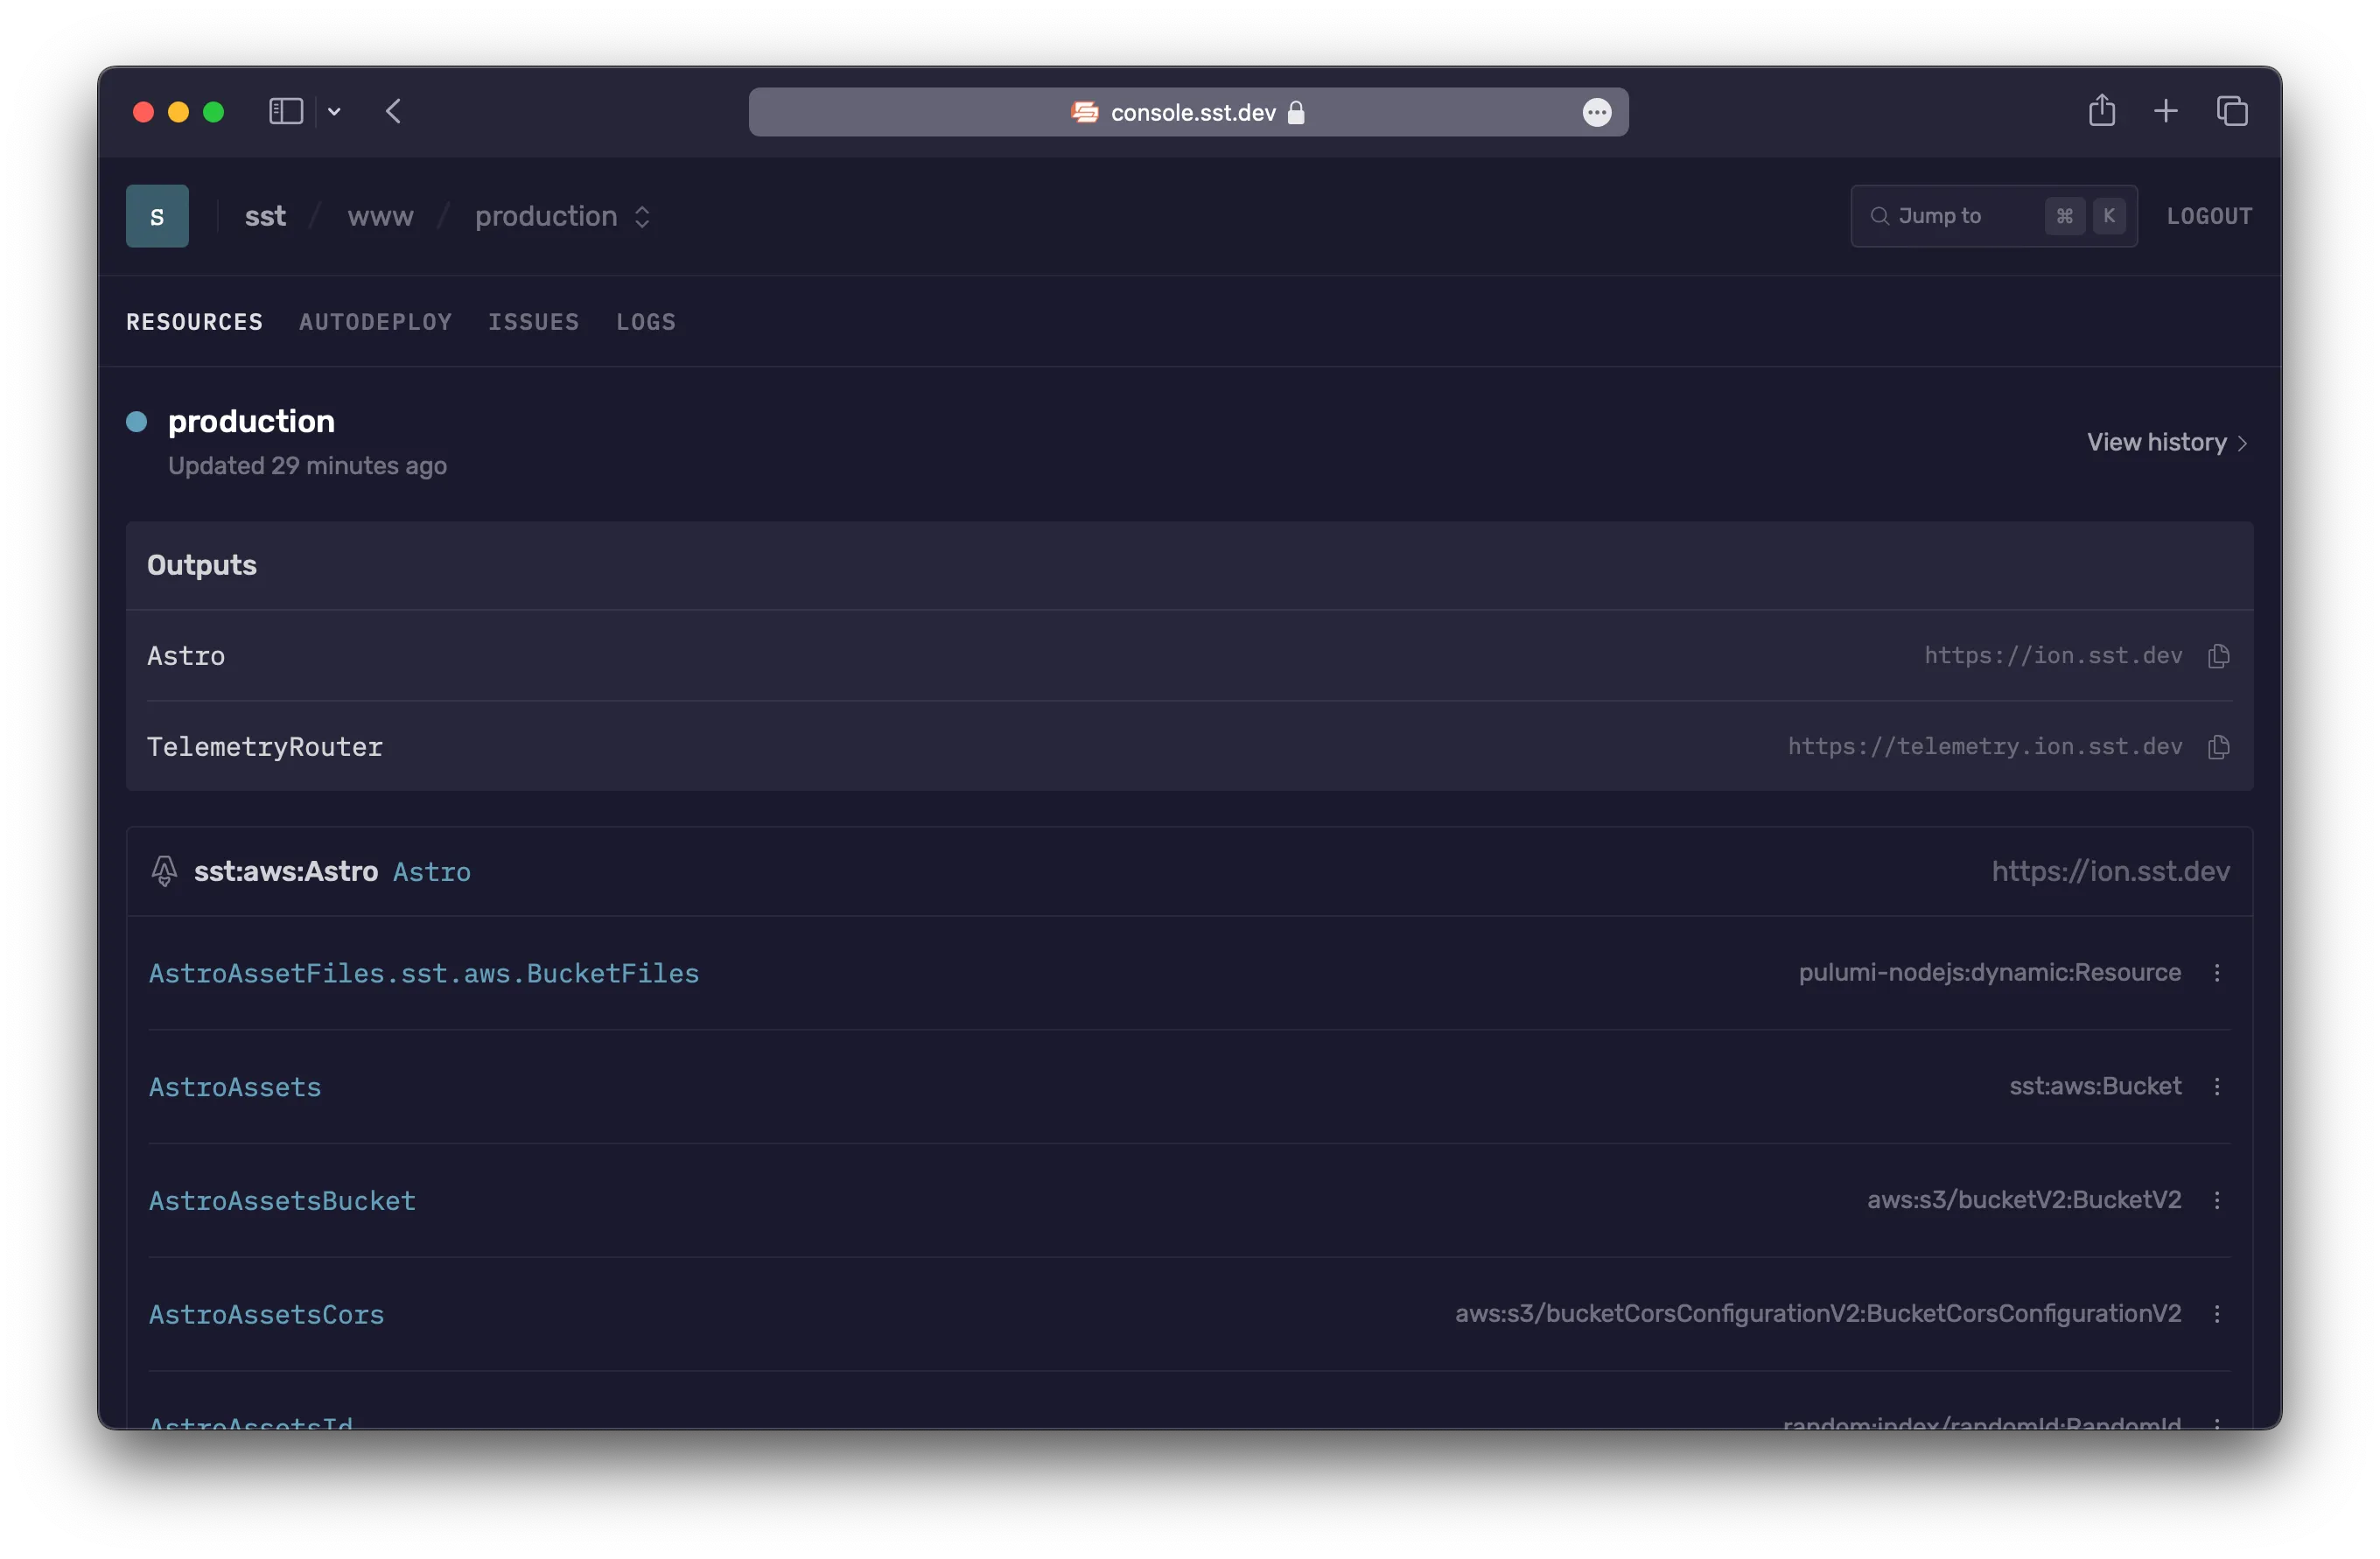
Resources
The Console shows you the complete state of the resources in your app. You can view:
- Each resource in your app
- The relation between resources
- The outputs of a given resource
- The full URN of the resource
- The update where the resource was created or modified
Update history
The Console also tracks all the updates that were made to your app. And the resources that were modified as a part of the update.
It also shows the SST command that was run that triggered the update. If the update was a part of an Autodeploy, it shows the related git commit as well.
Autodeploy
The Console can auto-deploy your apps when you git push to your repo. Autodeploy uses AWS CodeBuild in your account to run the build.
You are only charged for the number of build minutes that you use. The pricing is based on the machine config used. Learn more about CodeBuild pricing.
By default, a small CodeBuild machine is used. But you can configure this, we’ll look at how below.
Setup
To get started with Autodeploy:
-
Enable the GitHub integration
Head over to your Workspace settings > Integrations and enable GitHub. This will ask you to login to GitHub and you’ll be asked to pick the GitHub organization or user you want to link to.
If you have multiple GitHub orgs, you can create multiple workspaces in the Console.
-
Connect a repo
To auto-deploy an app, head over to the App’s Settings > Autodeploy and select the repo for the app.
-
Configure an environment
Next you can configure a branch or PR environment by selecting the stage you want deployed to an AWS account. You can optionally configure environment variables as well.
By default, stages are based on the branch name or PR. We’ll look at this in detail below.
-
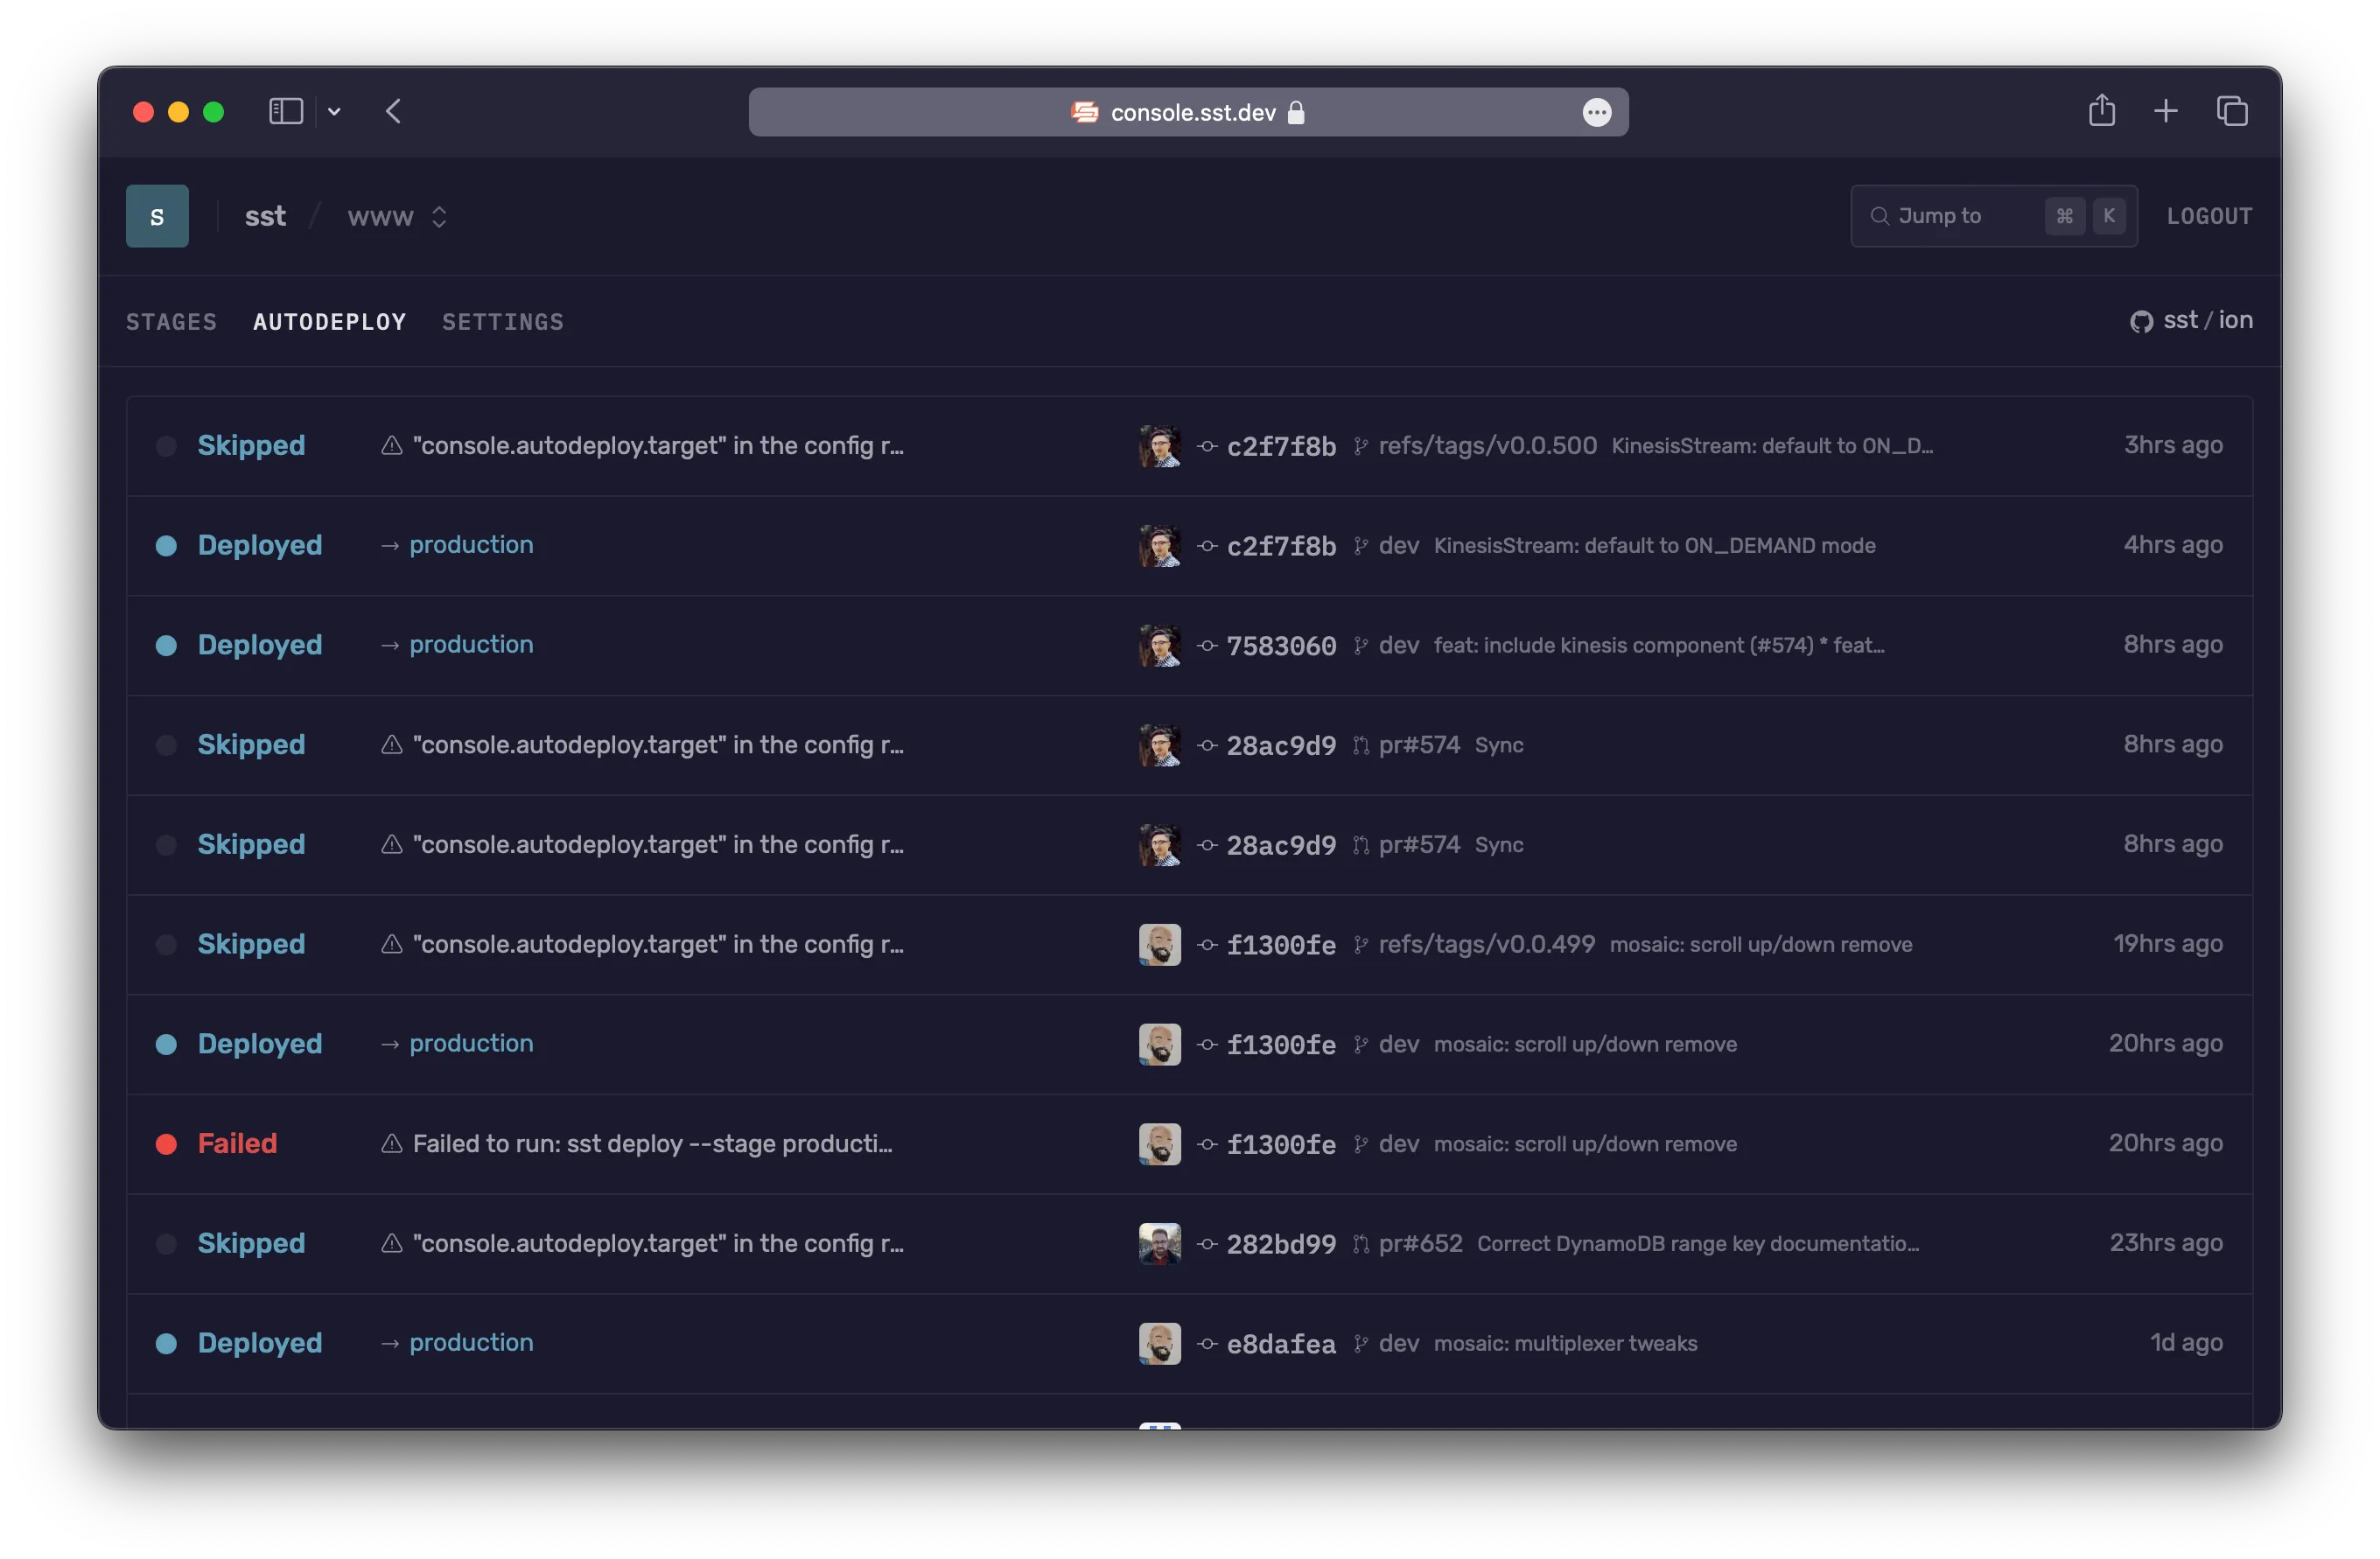
Git push
Finally, git push to the environment you configured and head over to your app’s Autodeploy tab to see it in action.
For example, if you configures a branch environment for the stage
production, any git pushes to theproductionbranch will be auto-deployed. Similarly, if you create a new PR, say PR#12, the Console will auto-deploy a stage calledpr-12. -
Setup alerts
Once your deploys are working, you can set the Console to send alerts for your deploys. Head over to your Workspace Settings > Alerts and add a new alert to be notified on any Autodeploys, or only on Autodeploy errors.
Config
The above behavior can be configured through the console.autodeploy option in the sst.config.ts.
For example, if you want git pushes to the main branch auto-deploy the production stage and use a large build machine, you set something like this in your sst.config.ts.
console: { autodeploy: { target(event) { if (event.type === "branch" && event.branch === "main" && event.action === "pushed") { return { stage: "production", runner: { engine: "codebuild", compute: "large" } }; } } }}Read more about this over on the Config doc.
Environments
The Console needs to know which account it needs to autodeploy into. You configure this under App’s Settings > Autodeploy. Each environment takes:
-
Stage
The stage that is being deployed. By default, the stage name comes from the name of the branch. Branch names are sanitized to only letters/numbers and hyphens. So for example:
- A push to a branch called
productionwill deploy a stage calledproduction. - A push to PR#12 will deploy to a stage called
pr-12.
As mentioned, above you can customize this through your
sst.config.ts.If multiple stages share the same environment, you can use a glob pattern. For example,
pr-*matches all stages that start withpr-. - A push to a branch called
-
AWS Account
The AWS account that you are deploying to.
-
Environment Variables
Any environment variables you need for the build process. These are made available under
process.env.*in yoursst.config.ts.
Build image
Autodeploy is run on an x86_64 machine using the al2/standard/5.0 build image.
You can change the architecture to use arm64 and it’ll use the al2/aarch64/standard/3.0 image instead. You change this by setting runner.architecture through the Config.
You can also configure what’s used in the image:
-
Node
To specify the version of Node you want to use in your build, you can use the
.node-version,.nvmrc, or use theenginefield in yourpackage.json.package.json {engine: {node: "20.15.1"}}.node-version 20.15.1.nvmrc 20.15.1 -
Package manager
To specify the package manager you want to use you can configure it through your
package.json."package.json {packageManager: "pnpm@8.6.3"}
Feel free to get in touch if you want to use your own build image or configure what’s used in the build image further.
FAQ
-
Do I need to use the Console to use SST?
You don’t need the Console to use SST. It displays the local logs from your terminal in a UI that’s more convenient.
-
What if I don’t want to pay for the Console?
You can still invite your team and use it to view your local logs and stages.
-
Do I need a credit card to get started?
The Console is free to get started and doesn’t need a credit card.
-
Which Lambda functions are included in the number of invocations?
The number of invocations are only counted for the Lambda functions in your SST apps. Other Lambda functions in your AWS accounts are not included.
-
Do the functions in my personal stages count as a part of the invocations?
Lambda functions that are invoked locally are not included.
-
Can I access the personal stages if I’m above the free tier?
If you go above the free tier in your production stages, you can still access your personal stages. Just make sure you have
sst devrunning locally, otherwise the Console won’t be able to detect that it’s a personal stage. -
My invocation volume is far higher than the listed tiers. Are there any other options?
Feel free to contact us and we can figure out a pricing plan that works for you.
If you have any further questions, feel free to send us an email.